Monday, March 28, 2011
Keeping busy until Spring
The temperatures are back down below freezing overnight, and not much warmer during the day. Therefore, gluing up the keelson to the stem and stern remain on hold.
Fortunately, there are enough other components to keep me busy in the workshop:
I made a pattern for the centerboard out of 1/4" plywood. It is ready for cutting, which I plan to have done at a steel fabrication shop. The plan calls for 7/8" steel, rounded over, and that is far more metalwork than I would like to do myself.
Of course there are always more coats of varnish to be applied while it's too cold to glue.
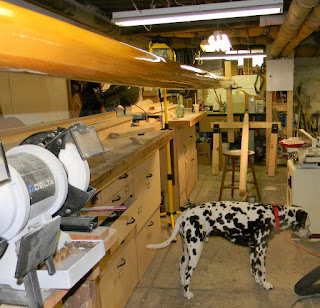
Here, the mast has just received coat number 5. My shop assistant, Bosco Brown, is shown in his usual position -- namely, attempting to stay awake in the shop while succeeding in catching nearly every drip of varnish, sealer, or epoxy, somewhere on his back, tail, feet, or head.
He does sing along with the router and the planer, however, so there is enough entertainment value for me to justify his presence.
A bit early for the samson post, perhaps, but it was a nice, simple fill-in project I could accomplish with some odd white oak boards, and a few inches of 3/8" silicon bronze rod. This way, it will be ready for me when the time comes (if I can find it then.)
By the way, in the religious war concerning whether you can successfully glue white oak with epoxy, I position myself among the yeasayers. My approach is to make sure the mating surfaces are rough -- at least 60 or 80 grit -- and wipe down the mating surfaces with either alcohol or acetone, letting them dry completely before gluing and clamping. Roughening the mating surfaces makes sense to me because it enhances the mechanical bond with the epoxy. I do the solvent wipedown just because so many people seem to think it is important. A bit of ritual for its own sake never hurt anyone.
The massive rudder is also white oak. The cheeks are glued with 3M 5200 marine adhesive sealant, but later I will rivet them to the shaft with 5/16" silicon bronze peened rods and copper washers.
For construction ease, I epoxy edge glued the boards in the blade, but I plan to come back and secure them more traditionally with bronze barbed drifts, drilled in at varying angles.
I thought that step should wait until I do the final fitting against the sternpost. Planing oak, while it may not be a walk in the park, is always easier than planing the ends of bronze rods.
Although the plan shows a simple roundover, I think I'll taper the aft side of the blade a bit, before I install it.
Subscribe to:
Post Comments (Atom)


Hi Charles, Making great way on your bits. I enquired about 7/8 steel here and found it a bit hard to find but one place has it fortunately. I'd be interested to know your price for the blank piece cut to shape versus what I pay? I havent got a template yet but its on the list. I'm concentrating on my shed and moulds at moment, I'm nearly ready to start making the frames. Always impressed how you snowbound people make any progress, must be a constant battle with the elements. All the best, its great to see your progress, blog is inspiring, maybe I'll have another go.
ReplyDeleteRegards Aussie Andrew
This comment has been removed by a blog administrator.
ReplyDelete